Chromebooks’ popularity has skyrocketed in recent years, thanks to the release of new models for both professionals and students. These laptops have numerous benefits, including a simple, efficient method for taking screenshots. Whether you use your screenshot for homework or to manage large business projects while working remotely, it can be a useful tool for teamwork.
Here are a few methods for quickly taking a screenshot on your Chromebook, as well as some reasons why you should do so frequently.
Explain a screenshot
A screenshot is an exact representation of your screen at a particular time. Consider it a screenshot of your screen. After that, the screenshot can be saved as an image file.
Screenshots are common on all types of screen-equipped devices, including smartphones, laptops, and desktop computers. There are a few differences when taking a screenshot on your Chromebook.
Screenshot on a Chromebook
A Chromebook’s keyboard is distinct and lacks some keys found on a full-sized laptop. The F1 and F2 keys, for example, will be hidden.
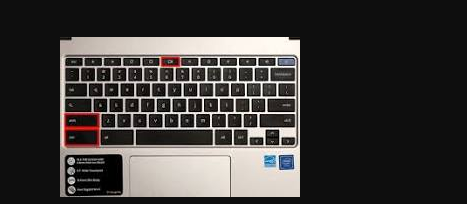
Chromebooks, on the other hand, have a Show Windows button that looks like a box with two arrows pointing up and down on it. This key is located in the middle of the top row on the keyboard of your Chromebook. This button will be used frequently by you, notably when you utilize the advice in this article to take screenshots.
On a Chromebook, How to Take a Screenshot
Because not every Chromebook user uses their keyboard in the same manner, Google developed a few different ways to rapidly take a screenshot. Adapt the one below to your workflow by using it.
- KERNEL SHORTCUT
To quickly take a full-screen picture, press Ctrl+Show Windows. The quickest method for taking a screenshot on a Chromebook, won’t work for partial or window screenshots.
For each other screenshot type, you can use a different hotkey shortcut to open the Screen Capture toolbar. To view the Screen Capture toolbar at the bottom of the screen, simply press Shift+Ctrl+Show Windows. - QUICK SETTINGS PANEL
Another way to get to the screenshot tools is through the Quick Settings panel. This is helpful if you forget the hotkeys combination or find it challenging to press three keys simultaneously. Look for the shortcut button on Chrome’s Shelf, which is on the clock, to access Quick Settings.
The settings menu will appear, and you can find the Screen Capture button to open the toolbar there. From there, you can take any type of screenshot you want, including full or partial displays and recordings. - SMALL CAMERA TOOLBAR
When you visit the Screen Capture toolbar, you can take a full screenshot, a partial screenshot, or a video clip. To capture any moving items on your screen, simply switch the toolbar button from stills to video.
Sound can also be added to your video! Using the settings icon, which looks like a gear, you may choose between a muted and a live microphone. You may use a live microphone to speak over your video, which is useful for filming instructions or providing comments. - THIRD-PARTY, EXTERNAL APPLICATIONS
You can also take screenshots without using the Chromebook-specific utilities. There are numerous reputable third-party apps available for this, some of which allow you to create.GIFs or edit your captures.
SnagIt from TechSmith is an outstanding example. Although it is not free, it does include a number of add-ons that allow you to customize your screenshot experience. It is also simple to share and edit. Before purchasing any software for taking screenshots, ensure that it is compatible with the most recent version of Chrome OS.
Your screenshots’ location
The perfect screenshot was just taken, but do you know where to look for it? You can view the last five items you saved to the Chrome Clipboard, including screenshots, by pressing the Search Key+V.
If you took the screenshot before those activities, all of your screenshots, even older ones, can be found in the Tote folder on the Shelf. If your screenshot isn’t displayed here, look for it in the Videos or Images folders of the Files app, depending on whether you took a still image or a video. - Screenshot Administration
Screenshots are quite important in current life. They’re a quick and easy way to share a funny meme, a brilliant recipe, or a worrisome social media comment that should be reported as harassment. If you take a lot of screenshots every day without organizing or eliminating them, you risk becoming inundated with these files, no matter how you use screenshots.
Screenshots take up space, especially on your Chromebook’s limited internal storage. Backing up screenshots to your Google Photos account is the easiest way to save them for later use. Examine and delete your captures on a regular basis if you don’t think you’ll need them again to reduce screenshot cut
One final note on taking a screenshot on a Chromebook
A snapshot may be the greatest way to deliver your message to colleagues or coworkers. Use it to document important events in your online life or to make visual lessons to help a loved one. It can also be used to record important financial occurrences. The possibilities for screenshots are truly limitless. And Chromebooks make it extremely
Keep in mind that a full snapshot captures everything on your screen, including potentially sensitive and confidential information you may not want to share. Check your screen captures carefully to avoid disclosing personal information that you don’t want others to see. This covers everything from website names in browser tabs to sensitive information such as bank accounts or medical histories.
Just make sure to clip out any sensitive information you don’t want others to view, and avoid using your business computer to take personal screenshots or vice versa. Screenshots are extremely useful, but it is far too easy to create and share a screenshot that puts you or your business at risk.


